Pages

Friday, December 13, 2013

12 Days of Christmas - Day 1


For the first post of Jenna's Gluten Free Kitchen's 12 Days of Christmas, I am not posting a recipe or even a craft. This first post is dedicated to giving back to our communities. I try my best to do my part in keeping my community nice by picking up litter, keeping my front porch swept, and decorating for the holidays... But to find more creative ideas on how I could give back in a more meaningful way, I had to do some research. Embarassingly, some of the items on this list should've come to me naturally because I see the need in my community everyday. I hope that this list inspires you as it has me and don't forget that this list applies all year round!

Volunteer at a local school, senior center, hospital or animal shelter. These places always need extra helping hands and the experience is mutually beneficial! Whether you are sharing a skill or experience, helping with daily tasks or just to lend an ear and laugh a bit, connecting with your neighbors (two-legged or otherwise!) in this way is priceless. You can never under-estimate the wonder of simple interactions between two beings. Working closely with the healthcare industry, I see the need for patients to have meaningful relationships everyday. The companionship for elderly people helps keep their mind sharp, gives them something to look forward to, and most importantly makes them feel needed. You don't necessarily have to have to have a special skill to help out, you can play cards, read aloud to residents, or even paint their nails. If you have an especially loving pet, you might consider asking if you can bring him/her in to socialize with the patients...I'm sure you already know the healing powers of your pooch's snuggles!

Give blood. This is one of the easiest things you could ever do to help someone. Blood banks are always in need of more. As the American Red Cross says, “Give the gift of life.” Find your local Red Cross Chapter and go from there. If you’re extra motivated, talk to your employer about becoming a corporate partner and organize a blood drive at work. My employer hosts quarterly blood drives making it convenient to give blood.

Handy-(wo)man? Painter? Super Friendly? Your local community theater could use your skills to contribute to their performances. Or your local community organization could use your help for fairs, parades, or other fund-raisers. Added bonus: you could make new friends!

Baking for your get together? Consider doubling your batch to share with an elderly neighbor, the local police station, or fire department. I plan on doubling my batch of Maple Bacon Pecan Brittle to take to my local fire department later this week.

Wednesday, December 4, 2013

Ohemgee Cauliflower

In case you haven't noticed (or maybe you're living under a rock), cauliflower is delicious! Although it's season is September-ish, it's delicious all of the time and I am completely addicted to it.
On my last trip to the store I found a nice head of cauliflower and some (read: AMAZING) chanterelle mushrooms, and so I knew that roasted cauliflower with chanterelles would become a thing in the very near future (tonight). This recipe is so stinkin' easy that it can hardly even be called a recipe! But share, I must. I want you to enjoy the ohemgee deliciousness that is this cauliflower just as I did this very evening. So here it goes:

Ingredients:

1/2 Head of Cauliflower, cut into bite-sized florets
Chanterelle Mushrooms, the same volume as the cauliflower, cut into slightly larger pieces than the cauliflower
1 tsp Fresh Rosemary, chopped
3 cloves of Garlic, minced
2 tbsp Olive Oil
Salt and Pepper to taste

Preheat your oven to 400F

Clean and cut up cauliflower, mushrooms, rosemary and garlic and place into a large bowl.

Note: Mushrooms are best cleaned using a damp paper towel. Running them under water causes them to cook up tough for some reason. Whole chanterelle mushrooms have a lot of crevices that are hard to get into to clean. I usually cut them up after I've cut up all of my other ingredients and then clean them with a paper towel because when they're cut up they have fewer crevices AND if I cut them up last, I don't have to worry about mushroom "dirt" getting on my clean veggies.

Add olive oil, salt, and pepper to the bowl and toss to coat the cauliflower and mushrooms.

Spread your cauliflower and mushrooms out on a rimmed baking sheet in a single layer. Don't crowd the pan. Making sure that you only have a single layer ensures that your ingredients will roast instead of steam.

Roast cauliflower and mushrooms in your preheated oven for approximately 35 minutes, stirring halfway through so that all of the edges have the chance to caramelize.

Enjoy!

Recipe written by: Jenna Throne

Friday, November 22, 2013

Crispy Coconut-Almond Granola

Crispy Coconut-Almond Granola
Granola is one of those grocery items that is totally easy to just grab off of the shelf and throw in your cart without thinking twice (GUILTY! Also, guilty of spending an unconscionable amount of $$ on the GF stuff...But I digress...).
Motivated by freshness and quality ingredients, I set out to find a granola recipe that was easily adaptable, without loads of refined sugar and bad fat. Thus, I stumbled upon: Nigella Lawson’s “Andy’s Fairfield Granola”
I love this recipe (I also love Nigella!!) because it is super simple. With this recipe, I can easily control the amount (and kind!) of sweeteners and fats, not to mention the quality and cost of the ingredients for a healthy breakfast or snack all week long.

Ingredients:

5 cups Gluten Free Old-Fashioned Rolled Oats
2 cups Flaked Coconut, Unsweetened
1 ¼ cups Almonds, Chopped
2 tsps Vanilla Extract
2 tsps Ground Cinnamon
1 tsp Dried Ground Ginger
¼ tsp Ground Nutmeg

½ cup Unsweetened Applesauce (or another unsweetened fruit puree)
½ cup Agave Nectar
2 tbps Coconut Oil, melted

Preheat the oven to 300F
1. In a large bowl, mix together the oats, almonds, vanilla and spices.
2. In a small saucepan (or in the microwave for about 30-45 seconds), warm the fruit puree with the agave nectar, and oil.
3. Mix the fruit mixture into the dry ingredients until the oats and nuts are covered evenly, then divide and spread the mixture evenly on two baking sheets.
4. Bake the granola for about 40 minutes, stirring every seven minutes, until the granola is golden brown. Your granola may take more or less time depending on your oven’s actual temperature.

5. Remove from the oven as soon as the granola is slightly golden brown and let cool on the baking sheet. You’ll be able to tell when it is done because the oats will feel lighter when you stir them.

This granola can be stored in an airtight container on the counter for a couple of weeks. AND because I had them on hand, I added: ¼ c Dried Gogi Berries, ¼ c Dried Blueberries, and ¼ c Dried Cranberries to my granola and it turned out even more amazing! Also, you can easily swap out coconut oil for another vegetable oil, and the nuts and flaked coconut for other "add-in" ingredients that you prefer, to create your ideal breakfast! Get creative!

This granola is great with milk, yogurt, or even ice cream! (I can't lie, I totally top my coconut ice cream with it...regularly.)

Happy Eating!

Tuesday, November 12, 2013

Jenna's Famous Grilled Lamb

I am not a fortune teller, but something tells me that in the very near future this lamb recipe will be very famous... This is by far the most requested dinner around these parts. This lamb is flavorful, juicy, and simple. I get my rack of lamb at Costco. It's Kirkland brand, already Frenched, and you cannot beat the price (really). This lamb recipe would be a really special treat for the holidays, I' m thinking of making it for Thanksgiving...Why should turkey get all of the attention?

Ingredients

1 rack of Lamb, Frenched
5 sprigs of Fresh Rosemary, stemmed and minced
5 sprigs of Fresh Thyme, stemmed and minced
3 cloves of Garlic, minced
2 tbsp Olive Oil
1 tsp Kosher Salt
1/2 tsp Fresh Ground Black Pepper

Preheat your grill to medium temperature. Disclaimer: I am fortunate enough to live in California, where grilling in the winter months is acceptable. This recipe could easily be made indoors: Preheat your oven to 400 degrees and prepare a roasting pan with a rack or large chunks of celery, onion, and/or carrot.

While your grill (or oven) is preheating, make a (delicious) paste out of your herbs, garlic, olive oil, salt and pepper. Mix well, mashing with your fork to combine so that all of the flavors become the best of friends.

Prepare the rack of lamb by patting it dry with a paper towel, so that the seasoning sticks to it. Then cover the Frenched bones with aluminum foil, so that they don't burn (or char) while cooking.

Next, massage (yes, really. massage) your seasoning paste onto the lamb to cover it, making sure to get both ends and the bottom.

Grilling:
Place your seasoned lamb fat side down on your medium heat grill, close the lid. Let grill for approximately 5-6 minutes, or until your lamb pulls away from the grill easily. Don't walk away! That lamb fat will make the grill fire's day by helping it flare up and char your lamb to an inedible crisp. (I speak from experience...) Turn lamb to the second side and continue to cook for approximately 7-8 minutes. Lastly, you'll flip your lamb one more time, back to fat side down, to crisp up the fat for a few short minutes over a high heat grill. Watch it, or it'll surely burn! (you've been warned)

Oven:
Place your seasoned lamb fat side up in your prepared roasting pan. Put the pan into your preheated oven and cook for approximately 5-7 minutes. Reduce the oven's temperature to 300 degrees and cook for approximately 12-15 minutes longer, depending on how well you like your lamb cooked.

I like my lamb medium-rare, which is how I've written this recipe. If you prefer your lamb more well-done, cook it longer. You can tell how well a piece of lamb is cooked by how much it gives when you press on the meatiest section gently with tongs. If it doesn't give much, it's cooked more thoroughly; if it gives easily to the pressure, it is more rare.

Once your lamb is done to your liking, remove it from the heat and cover it with aluminum foil for approximately 5-10 minutes. This step allows the juice in the lamb to redistribute and results in much juicier servings. Don't worry, the foil keeps it from getting cold.

I like to serve my lamb with grilled asparagus and garlic quinoa. But this lamb recipe is very versatile and could be served with anything that you like, including mint jelly... Blleeeehhhh...

Recipe by: Jenna Throne

Skinny Zucchini Pineapple Muffins


So, I haven’t posted any recipes in awhile. Blame it on my lack of creative juices… busy schedule…or just plain laziness, I will not!! I don’t have any great excuses, only that I’ve been testing a lot of recipes and none of them have been up to par, or awe-inspiring, or worthy of posting to the blog. This blog is a record of my recipe successes, not my recipe “meh, that’s edible…”

I think someone once said, necessity is the mother of invention, and that is exactly how this recipe was born. I like to sleep in in the morning for every single second I can before I actually have to get up and go to work, and breakfast doesn’t win out over sleep. But eat, I must. So, I needed a (healthy) breakfast that I could grab on my way out the door to eat in my car during rush hour AND something that meets all of my other insanely neurotic requirements:
Free of dairy, gluten, refined sugar
Low-fat
Low-calorie
High fiber
And high protein to keep me full until I can find a minute to stuff my face with my second meal of the day (lunch…)

Thus, Skinny Pineapple Zucchini Muffins were born! (I know, I’m excited too…) I think (read: HOPE!!) that I’ve created a recipe that you will love! They are a delicious, quick grab-and-go breakfast, and healthy to boot. These Skinny Pineapple Zucchini Muffins are dairy, gluten, oil, and refined sugar free! I hope that you love them as much as I do.

Skinny Pineapple Zucchini Muffins

1 cup Gluten Free All-Purpose Flour
1 cup Gluten Free Quick Cooking Oats
1 1/8 tsp Baking Soda
½ tsp Salt
1 tsp Xanthan Gum
½ tsp Cinnamon
1/8 tsp Ground Nutmeg
½ cup Walnuts, Chopped (OPTIONAL)
1 large Egg, Beaten
½ cup Coconut Sugar
1 tsp Vanilla
¾ cup Unsweetened Applesauce
¼ cup Cultured Almond Milk Yogurt, I used SO Delicious Brand
1 cup Zucchini, Shredded
½ cup Crushed Pineapple in Juice

Preheat oven to 350 degrees

Line muffin pan with muffin liners
Please note: When I am baking gluten free, I like to use either a whisk or a fork (depending on what I am making) to combine my ingredients, so as not to over mix. Gluten free baking components tend to absorb the wet ingredients quickly, which is why it is important to make all necessary preparations in advance, so that your batter isn’t sitting for an extended period of time. Preheat your oven, line your muffin pan, get all ingredients out on your workspace so they are ready to use. If the batter sits, your baked good may end up with a less than appetizing texture.

Combine all of the dry ingredients in one bowl: Flour, oats, baking soda, salt, xanthan gum, cinnamon, nutmeg, and walnuts if you’re using them. You can really substitute any type of nut that you have on hand, or even dried fruit if you’re feeling like a real rebel!

In a separate bowl, combine the wet ingredients: egg, sugar, vanilla, applesauce, almond milk yogurt, zucchini, and pineapple.

Stir your dry ingredients into your wet ingredients, just to combine. Do not over mix.

Fill muffin cups with the prepared batter. I used a 1/3 cup measure to fill my cups, but you could use an ice cream scoop or another method, just ensure that the cups are filled to the rim.

Bake in a 350 degree oven for 15 minutes and rotate the pan. Bake for another 10-12 minutes or until a toothpick inserted into the center of a muffin comes out clean.

This recipe makes about 12 muffins. The muffins freeze really well if they are cooled entirely before freezing. I store mine in the freezer in an airtight container and pull one out each morning and microwave it for about 45 seconds to defrost/warm up.

Recipe by: Jenna Throne

Monday, October 28, 2013

Not Just Another Weeknight Chicken...version Trader Joe's


So, we are all always looking for another chicken recipe. How can we make the same ole’, same ole’ new again? And easy, and fast, and healthy, and cheap? This chicken recipe meets all of those requirements. It meets those requirements because you use a little help from the most highly trafficked grocery store that I can(barely tolerate) think of: Trader Joe’s. How can you beat the convenience (and avoid the masses) of Trader Joe’s?? You can’t. Stop trying. Go to Trader Joe’s and buy a jar of Artichoke Antipasto. It’s a little pickle-y for my taste on it’s own, but that can easily be remedied with two other Trader Joe’s conveniences: frozen crushed garlic cubes and frozen chopped basil cubes. I know, you can’t beat that. You won't even have to pull out a knife or a cutting board for this recipe. I promise!

Ingredients:

4 Chicken Breast Cutlets, these are the skinny slices of the breast. Make your own here (BUT you’ll need a knife and a cutting board…Sooo… Give your butcher some job security…)
2 Cubes of Crushed Garlic, (Trader Joe’s frozen)
2 Cubes of Chopped Basil, (Trader Joe’s frozen)
1 (large) Splash of White Wine (It’s a good reason to open a new bottle. White wine will be perfect with this dinner!)
8 Tbsp of Artichoke Antipasto, (Trader Joe’s jarred)
Olive Oil
Salt and Pepper to taste

Preheat olive oil in a large skillet over medium heat. While it’s preheating, season your chicken with salt and pepper to taste.
Drop the crushed garlic and the basil into the preheated oil, and then add your seasoned chicken to the pan, followed by a splash of white wine.
Cook chicken approximately 2-3 minutes on the first side, then flip the chicken over and coat the cooked side of each piece of chicken with about 2 tablespoons of the Artichoke Antipasto. Put a lid on the skillet and let all of those delicious flavors marry for approximately 5-6 more minutes or until the chicken is cooked thoroughly.

And there it is. Done. Delicious. Easy. Especially easy if you serve it with steamed veggies and microwave Seeds of Change garlic quinoa rice from Costco! You could add a little something extra to your chicken by giving it a squeeze of fresh lemon juice while cooking, and adding some capers or chopped green olives near the end of cooking.

Tuesday, October 15, 2013

Winner, Winner, Chicken Dinner!


Roasted Chicken and Root Veggies:

This is one of my main dinner staples. When I get home from a hard day at work, the last thing I want to do is slave over a hot stove. This recipe is simple and the hardest part is changing the oven’s temperature part way through… The majority of the work in this recipe goes into cutting the veggies, which I find pretty therapeutic…Pretend those veggies are the problem that you had to deal with at work today and cut them up and eat them…Voilà! Problem solved. (Or you can just use the grocery store’s help and buy their pre-cut veggies if you’re not nearly as crazy as I am…)
Serve this recipe with a side salad to add something green to your plate without a lot of work. I usually do an arugula salad dressed with extra-virgin olive oil, a squeeze of lemon juice, and some salt and pepper.

Ingredients –

1 large Sweet Potato, cubed into 1” chunks
1 cup of Rutabaga, cubed into small bite sized pieces
½ cup of Turnip, cubed into small bite sized pieces
1 Carrot, cut into 1” chunks
2 stalks of celery, cut into 1” chunks
½ a small onion, cut into ½” wedges
4-ish cloves of garlic (I like it garlicky!!), smashed with the side of your knife and palm of your hand
2 tbsp of Olive Oil, don’t use the expensive stuff here…It’s getting cooked…
4 pieces of chicken thighs, whole, skin on
Season to taste. You can use salt and pepper, maybe some ground garlic, but I prefer McCormick Montreal Steak Seasoning. It has everything it in already and can be added in one step (I’m lazy…). For this recipe, I use about a tablespoon of seasoning on everything, veggies and chicken.

Preheat your oven to 425 degrees.
Line your baking dish with foil, any oven-safe dish really, this recipe is not only versatile, it’s very forgiving…You could use a baking sheet (like me), or a square casserole, just line whatever dish you pick with foil so that you don’t have to clean the pan when you’re done (…Again, I’m lazy).
In a large bowl, combine veggies, garlic, onion, 1 tbsp of olive oil, and seasoning of choice. Stir to coat veggies. Place veggie mixture into your prepared baking dish.
Wash your chicken (!!!) and pat it dry. Place the chicken pieces on top of the veggies that you’ve already put in their designated baking dish. Coat the chicken pieces with the remaining olive oil and season to taste.
Here’s the hard part: you have to set the timer…AND change the oven temperature…I know, it’s a lot to ask, but the end result is worth it…
Put your prepared dish into your preheated 425-degree oven. Bake for 15-20 minutes (this gives you that sinfully delicious, heart-attack inducing, crispy chicken skin). After the 15-20 minutes are up, turn the oven temperature down to 350 and bake for approximately 40-45 more minutes, this time varies because not all ovens run exactly to temp. Check your chicken’s doneness by sticking a knife in the thickest part of a piece and twist it just so to make the juices run. If the juices run clear, your chicken is done! If the juices run pink-ish or red, cook your chicken longer because it’s not done; and I don’t think eating or serving raw chicken will win you any new friends.

Monday, October 14, 2013

Thai Green Curry Chicken

This Thai Green Curry Chicken is such an easy, quick, weeknight meal that really takes the boring out of the same old chicken. Another major time saver for this recipe is minute rice or precooked rice that you can just throw into the microwave for a minute and a half and be done with. I have a rice cooker and I’ve tried to make rice a million times, I’m just not good at it, so I take all the help that I can get from the store when I want to have rice with dinner. Also, Costco usually has this precooked rice in a large package of six bowls in the pantry area, or a quinoa and rice mix in the freezer section. Both are delicious and major time savers. Another option is to serve this curry with brown rice Pad Thai noodles, which are widely available in grocers’ international foods section.
Thai Kitchen makes a very good green curry paste, and all of their curry pastes (red, green, and roasted red…) are on sale this week at Whole Foods. Their green curry paste is gluten free, but it isn’t very spicy so I add a couple of chilies to my curry to spice it up. Side note about chilies: the skinnier and pointier the chili, the spicier. So, if you like spicy, go ahead and pick the pointy chilies.
You’ll notice that I only use one chicken breast in this recipe, my reason behind that is to decrease the cost while still keeping it balanced and healthful, but this recipe is very versatile; you can use more meat and less veggies or even substitute shrimp for the chicken. If you substitute in shrimp, just add it when you add the green curry paste to your coconut milk so that it doesn’t overcook.

Thai Green Curry Chicken:

1 Chicken Breast, cut into bite sized pieces
2 Serrano chilies, minced, seeded if you’re sensitive to spicy food or Optional
2 Cloves Garlic, crushed
1 inch of Fresh Ginger, minced
2 cups of Veggies (I used: Frozen peas and green beans, fresh bell pepper, and fresh broccoli, but you can use whatever you like…), cut into bite sized pieces
2 tbsp Thai Green Curry Paste, I use Thai Kitchen brand (it’s GF!)
1 13.5 oz. can of regular (not light) Coconut Milk (shake well before opening!)
1 sprig of basil (Thai basil if available), torn into pieces by hand
1 tbsp Thai Fish Sauce, I use Thai Kitchen brand (it’s GF!)
Salt and pepper to taste

In a skillet over medium heat, add a tablespoon of olive oil and sauté meat until almost cooked through (adding salt and pepper to taste, remembering that fish sauce is salty!); then add in chilies, garlic, ginger, and veggies to meat. Cook together for approximately 3-5 minutes over medium heat; you’re only trying to cook the veggies to remove their “rawness”; you still want them crunchy and fresh tasting in your curry. Stir in the coconut milk and bring to a simmer. Stir in curry paste and bring to a boil, reduce heat and simmer for 5 minutes. Add fish sauce and torn basil just before serving.

Serve over jasmine rice in a bowl and you’re set!

Shopping List for Dinners Oct. 14-18th

I have a confession. I shop at Whole Foods (WF). I shop at Whole Foods almost exclusively, besides my weekly stop at my neighborhood farmer’s market and my very occasional stop at Trader Joe’s when I am feeling fierce enough to battle that jungle. I know, I know… “Whole Foods is big business, it’s too expensive, blah, blah, blah…” But I think that Forbes once told me that Whole Foods is a great company to work for AND Whole Foods has TONS of gluten and dairy free options, not to mention all of their organic products. I should also mention that I try to eat organic as much as possible, but especially when the food has a soft exterior, think: plums, berries, potatoes, celery, etc... Beware: Foods labeled as ‘’natural” are not the same as organic foods. Organic foods will be labeled as such. (Learn more about identifying organic produce here)
Anyway, I’m not saying that you need to shop at Whole Foods too; I’m saying that I like it and it’s what I use to make my shopping lists.
The relationship between Whole Foods and me was meant to be, fate, if you will…

This is my shopping list (by department) for dinners during the week of
October 14 – 18th for the following dishes:
Monday – Thai Green Curry Chicken
Tuesday – Roasted Chicken w/ Root Veggies
Wednesday – Roasted Cauliflower Sausage Pasta Bake
Thursday – Wayside Style Wings
Friday – Lemongrass Basil Chicken

I'll post pictures and the recipes after I make them for dinner each night!

Pantry:
Coconut Milk (2 Cans)
Green Curry Paste (I like Thai Kitchen)
Fish Sauce (I like Thai Kitchen)
Water Chestnuts (1 Small Can)
Jasmine Rice (Any rice will work, I just like the flavor of Jasmine)
Tomato Paste (1 Tube)
Fire Roasted Diced Tomato (1 Can, Muir Glen on sale this week at WF)
Dried Red Pepper Flakes
Gluten Free Pasta, (I really like Tinkyada’s brown rice dried pasta, it doesn’t get mushy or soggy and most importantly it tastes good!)
Olive Oil

Produce:
Garlic
Yellow Onion (1)
Ginger (4 Inches) – If you buy too much, it freezes really well.
Lemon Grass (1 Stalk)
Serrano Chilies (4)
Jalapeno (2)
Scallions
Basil
Bell Pepper – (1) Any color you like. I tend to buy green because they’re cheaper.
Celery (2 Stalks)
Carrot (1)
Rutabaga (1)
Parsnip (1)
Hard Squash (1, On sale this week at my WF)
Cauliflower (1 Head)
Zucchini (2 Small)

Meat:
2 lbs. Chicken Wings (split, tips removed)
Chicken Breast (3, boneless, skinless)
Chicken Thighs (3, boneless, skin on)
½ lb. Turkey Sausage

Frozen Foods:
Green Beans (1 Bag)
Peas (1 Bag)
Sweet Potato Fries (1 Bag, Alexia has a coupon at WF this month)

Friday, October 11, 2013

Ground Turkey Larb


In 2006 I was working at a day spa when I met a Cosmetologist named Lisah. Lisah is one of those people who can make friends with anyone because she is genuinely nice and has such a great sense of humor that it’s hard not to like her. For Lisah’s 21st birthday she invited us to a party at her house, and me, unsuspecting as I was, I brought a huge bag of tortilla chips…Thinking it was a “pot-luck” type of party…I was wrong, Ooopppss! We arrived to a huge spread of traditional Laos food, none of which I recognized because at that point the most exotic thing I had ever consumed came from Wonderful Chinese Food restaurant (yes, that’s really what it’s called) in a strip mall in my home town.
Lisah’s birthday spread included: Spicy Green Papaya Salad with Crispy Chicken Feet (Seriously, eat crispy chicken feet if you have the opportunity. I wouldn’t lead you astray…), Crispy Rice Salad (Nam, but also nom, nom, nom), and Grilled Oysters… Needless to say, I was a little weary of eating this food that I didn’t even recognize. Luckily, my manners (but mostly my faith in Lisah’s good judgment) encouraged me to try these new dishes and I don’t regret it for a second! It was at that point that I became indebted to Lisah forever (dun, dun, dun…), for inspiring me to try new foods, to live outside of my comfort zone, and experience new things. Since that night at Lisah’s party, I’ve tried many different kinds of food and am always looking for new inspiration for my cooking. I like to challenge myself and test my skills for personal growth. To be honest, I have very few dishes that I make regularly because I always want to try something new. So now, it’s my turn to inspire you. Try something new, and think of Lisah and me when you do. Thanks, Lisah!!! You’re the best!

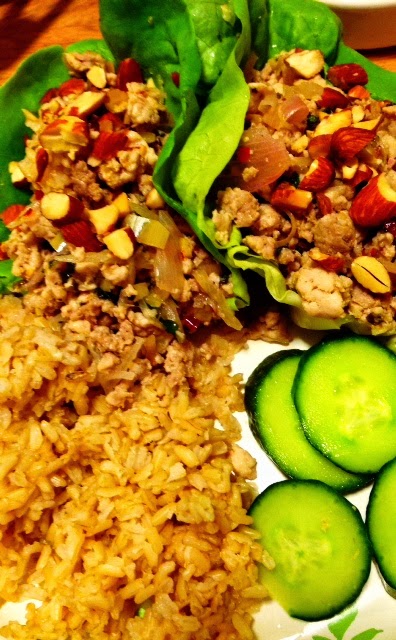
Ground Turkey Larb (Laab or Laap):
Larb is a traditional Lao minced meat dish that can be made with any ground meat. I find that ground chicken or turkey lend themselves nicely to the flavors of the herbs and the dressing. Stronger flavored meats, like beef can over power the herbs. This recipe is delicious because appeals to all five taste sensations, as most Asian dishes do. The five taste sensations are: Sweet, Sour, Salty, Bitter, and Umami (or Savory). This Larb tastes even better the next day!
Please see the notes at the end of the post related to serving and preparing lemongrass.
Dressing:
Fresh lime juice, from about 4 limes, if your limes aren’t juicy, put them in the microwave for about 15 seconds and they’ll yield much more juice, or you can use your palm to forcefully roll whole limes back and forth on your counter top to soften them up.
5 sprigs of Cilantro, stemmed, chopped
2 tablespoons fish sauce, I use Thai Kitchen (it’s GF!!)
1 teaspoon of red pepper flakes
2 tablespoons honey
Larb:
3 tablespoons olive oil
3 shallots (cloves), thinly sliced, lengthwise
2 Garlic Cloves, minced
1 2 inch piece of Ginger, peeled and minced
1 4 inch piece lemongrass the softer white portion of the stalk, minced *See Notes
3 Thai chilies, or 3 Serrano chilies, stemmed, thinly sliced
Sea Salt, to taste, remembering that fish sauce is salty
1 ½ pounds ground turkey, preferably dark meat
½ cup chopped fresh mint leaves
Freshly ground black pepper
1 head butter lettuce, leaves separated
Optional:
Roasted Chopped Nuts to garnish
Green Beans
Sliced Cucumber
Cabbage
Dressing: In a small bowl, whisk together the lime juice, cilantro, fish sauce, red pepper flakes, and honey. Set aside.
Larb: In a large skillet, heat the oil over medium heat. Add the shallots (Your friends will be really impressed if you discuss the subtle nuances in the flavors of onion vs. shallot…By “impressed”, I mean bored.), garlic, ginger, lemongrass, chili, and salt to taste. (It’s important to season every layer when you’re cooking. When you add another ingredient to the pan, season to taste.) Cook until the vegetables begin to soften, about 5 minutes. Add the turkey and season with salt. Cook, stirring frequently, until the meat and vegetables are cooked through, about 10 minutes. Add the dressing to the pan and cook for an additional 2 minutes. Remove the pan from the heat and stir in the mint. Season with salt and pepper to taste.
Spoon the Larb onto the prepared lettuce leaves and serve.
NOTES: When you order Larb (Laab or Laap) at a restaurant, they garnish it with roasted, chopped peanuts. I like to garnish our larb with roasted chopped almonds to add crunch. Larb (Laab or Laap) can be served with sticky rice and an assortment of vegetables, such as green beans, sliced cucumber, or cabbage.
Lemongrass is kind of an unusual ingredient, but it can be found in most grocery stores. It is a long, skinny stalk that’s usually light green in color and lighter near the root end (see picture). When you are ready to prepare your lemon grass, peel off the outer most layer of the stalk and discard. You’ll notice that the stalk is very stiff, so, you’ll want to pick a very sharp knife to mince it. To make the mincing easier, tenderize the portion of the stalk that you plan to use with the dull edge of your knife by hitting the lemongrass repeatedly and forcefully until the stalk is softer. Once it’s softened, use the sharp edge of your knife to mince your lemongrass.
If we’re being honest, my Larb recipe isn’t exactly traditional, but it hits all of the same flavor notes as the real thing and has ingredients that are pretty easy to come by. The recipe does not include the traditional toasted rice powder because it’s not easy to find and it’s a lot of work to make on a weeknight. But, if you’d like to use the traditional toasted rice powder and can’t find it at your local store, there’s a great (and simple enough) recipe at: SheSimmers.com
Enjoy!!

Wednesday, October 9, 2013

Pumpkin Streusel Breakfast Bars


These bars were created in honor of October and the glory that is fall in Northern California. Since I moved to San Francisco, I miss out on my family’s fall traditions, like trips up to Apple Hill in Camino, CA and baking apple pies with my mom. These Pumpkin Streusel Breakfast Bars warm my heart just like a family trip to Apple Hill, or baking with my mom. They taste just like pumpkin pie, but in cake form, with a crunchy-nutty topping! One word: YUM!

Ingredients -

Streusel Topping:
¼ cup Coconut Sugar
2 tablespoons Coconut Flour
2 tablespoons Coconut Oil
½ teaspoon Ground Cinnamon
½ teaspoon Ground Ginger

Pumpkin Bars:
2 cups Gluten Free All Purpose Flour
½ cup Gluten Free Almond Meal
½ cup Gluten Free Coconut Flour
1 ¼ cups Coconut Sugar
2 teaspoons Gluten Free Baking Powder
1 teaspoon Xanthan Gum
¾ teaspoon Sea Salt
1 teaspoon Ground Cinnamon*
1 teaspoon Ground Ginger*
¼ teaspoon Ground Nutmeg*
¼ cup Coconut Oil, plus extra for greasing baking sheet
2 Eggs, Beaten
1 cup Pumpkin Puree, plain, not the pie filling
1 tablespoon Vanilla
1 cup Walnuts, Chopped (Optional; can be replaced with another nut of choice…Or Cacao Nibs!! Yum!)
*If you have Pumpkin Pie Spice, use 2 ¼ teaspoons here instead of these three ingredients separately.

Prepare:

Gather all ingredients, including your eggs

Tools:
1 Large Mixing Bowl
2 Small Bowls and 2 Forks (to beat eggs and make streusel topping)
1 Whisk
1 Electric Mixer or a VERY strong forearm and your whisk
1 Cup, ½ Cup, ¼ Cup Measures
1 Tablespoon Measure
1 Teaspoon, ¼ Teaspoon Measures
1 Off-Set Spatula
1 11 x 7 Inch Baking Pan or Sheet

One thing that I’ve learned in gluten free baking is that speed is key. If batters sit too long their consistency changes and can yield less than desirable results. So, when I am baking, I get every thing I’ll need for the recipe (tools, ingredients) out first and have them ready to go on my workspace so that I can move quickly. I also try to write my recipes in order so that batters aren’t sitting for an extended period of time. “User friendly”, I think they call it…

Instructions:

Preheat the oven to 350 F

Liberally grease baking sheet with coconut oil

In a small bowl, combine the streusel topping ingredients with a fork, or by rubbing the mixture with your (clean!) hands (one less dish to clean!).

In a large mixing bowl, whisk together the dry ingredients. Whisking is a necessary step to break up the usual clumps that form in gluten free flours. You want your batter to be as lump-free as possible and whisking makes that possible. In a separate small bowl, combine your nuts with one heaping spoon of your dry ingredient mixture. Stir to coat nuts and set aside. This step ensures that your nuts won’t sink to the bottom of your bars. You’re welcome.

Next, add the coconut oil to the dry ingredients and beat with an electric mixer just until crumbly. Add beaten eggs, pumpkin puree and vanilla, and beat until the batter is smooth, about 2 minutes. Your batter will be very viscous (or tight). Add in the nuts and stir to combine.

Pour (or scrape) the batter onto your prepared baking sheet. Smooth the batter with an off-set spatula or a butter knife so that it fills the bottom of the pan completely. Getting your spatula a little wet might help this process along.

Sprinkle on the streusel topping evenly.

Bake in preheated oven for 20 to 25 minutes. A toothpick or knife inserted into the middle of the bars should come out clean when they are done. Baking times vary by oven, so start with the minimum amount of time suggested and then check them. You can always bake something longer, but you can’t fix burnt baked goods.

Cool your bars in the pan on a wire rack for about half an hour or so. Use a very sharp knife to carefully cut your bars into the desired portions, remove them from the pan, and continue to let them cool completely on the wire rack…if you’re patient. But, if you’re like me, eat them when they’re cut and try your very best to save some for later…unsuccessfully.

Enjoy!!

Blueberry Oat Bars minus the Starbucks


Recently, I was thinking about how different life in San Francisco is compared to what it was when I was growing up in the suburbs. All I knew was big business, Starbucks, Target (which I’ll never betray! I LOVE YOU TARGET!!), McDonald’s (blleehhhhhh!!), Chipotle, etc., etc… But I can’t lie; moving to San Francisco changed me, it changed me for the better. I became aware of the need to support my local businesses and the relationships, the sense of community, which is built when you’re a regular at your local businesses. Supporting local business is important because the people who own these businesses are your neighbors, trying to live their dream by owning their own business and being their own boss. Who am I not to support someone living his or her dream? Local businesses recognize and appreciate your business and create a sense of community that can be lacking in this big city. Almost immediately after moving to San Francisco a sense of community became a necessary ingredient in my personal happiness. With my personal happiness comes inspiration to create recipes that meet our dietary restrictions and fulfill my cravings for the food from the big businesses of my hometown! Lucky you!! So, here it is, without further ado…

Blueberry Oat Bars minus the Starbucks:

Once upon a time, Starbucks made a deliciously sinful blueberry oat bar full of refined sugar, gluten, and maybe even dairy…GASP!!... and I loved that blueberry oat bar for breakfast with my dirty chai latte. Alas, I replaced my regular (suburban) Starbucks visits with visits to my (urban) local coffee shop but still longed for a delicious blueberry oat bar that I could enjoy considering our dietary restrictions. Thus, GF, DF, Refined Sugar Free Blueberry Oat Bars were born (or made, if that word grosses you out less…)

Ingredients

2 cups fresh or frozen blueberries
¼ cup agave nectar, or less depending on the sweetness of your berries and your palate
2 tablespoons water
2 teaspoons lemon juice
1 ¾ cup gluten free oats, uncooked
1cup gluten free almond meal
½ cup of gluten free coconut flour
¾ cup coconut sugar, firmly packed
½ cup chopped nuts; I used walnuts (this is an optional ingredient)
½ teaspoon gluten free baking soda
½ teaspoon ground cinnamon
½ teaspoon sea salt
¾ cup coconut oil, melted, plus extra for greasing your baking sheet.
**I use coconut oil when I bake because of all the dairy free options, it behaves the most similarly to butter and has the fewest ingredients, all of which I can read and recognize.

Prepare:

Gather all of the recipe ingredients

Tools:

1 mixing bowl
1 sauce pan
1 11 x 7 inch baking pan
1 cup, ½ cup, ¼ cup measures
1 tablespoon measure
1 teaspoon, ½ teaspoon measures
A fork (or clean fingers!)
Heat proof spatula
Improvise your tools as needed (I can’t always find all of my measuring spoons…)

Preheat oven to 350 F

Grease 11x7-inch baking pan with coconut oil

Blueberry Filling:
In a medium saucepan, combine blueberries, agave nectar, and water. Bring to a boil, reduce heat and let the blueberry-filling simmer uncovered. Stir in lemon juice. Since I do not use cornstarch to thicken the blueberry filling, it’s important to let the blueberry-filling simmer uncovered, letting it reduce until it thickens naturally, approximately 10 minutes, depending on whether you used frozen or fresh berries.

Crust and Topping:
While your blueberry filling is simmering away, combine oats, almond meal, coconut flour, coconut sugar, nuts (if using), baking soda, cinnamon and sea salt

Add melted coconut oil, mixing until crumbly. You can use a fork but clean fingers make quick work of this step!

Reserve approximately one-third of your mixture for the crumbly topping and firmly press the remaining mixture onto the bottom of your greased 11x7 inch baking pan, creating the crust.

Bake your crust for 10 minutes.

Spread your prepared blueberry filling over your partially baked crust, leaving ¼ inch of space around the edges, so the filling doesn’t spill over onto the bottom of your oven.

Sprinkle reserved oat topping mixture evenly over the blueberry filling and lightly press the topping down into blueberries.

Bake 18 to 20 minutes or until topping is golden brown.

Cool completely in the pan on a wire rack, if the bars are not properly cooled, they tend to crumble apart.

Once cooled, use a very sharp knife to carefully cut your blueberry oat bars into desired portions.

Store tightly covered

You can freeze the bars in an air-tight container or a freezer bag and pull them out one at a time for breakfast or a snack, defrost them by microwaving them for about 20 seconds.

Enjoy!!

Thursday, August 22, 2013

Stuffed Zucchini with Avocado Dressed Salad


Besides being healthful, adaptable, and wallet friendly, this recipe is a great make ahead meal. You can make your turkey filling ahead of time and store it in the fridge. When you’re ready to make your stuffed zucchini, just pull out your pre-made turkey filling, prep your zucchini into boats and stuff the boats with your turkey mixture. Pop them in the oven at 375° and cook until completely warmed through.

Stuffed Zucchini
Makes 6 Zucchini Boats

3 Zucchini, halved lengthwise & cored to create boats. I use a small spoon to core my zucchini, ensuring that I leave enough of the vegetable in tact around the bottom and the edges to hold the filling. Also, reserve the core to use in the filling! No reason to waste perfectly good zucchini…
¾ lb. ground turkey meat
1 c precooked brown rice
½ small sweet onion, diced
3 cloves of garlic
2 tsp Italian Seasoning
S&P to taste

Preheat oven to 375° Fahrenheit

Sauté onion and garlic until soft. Add the ground turkey and seasonings to the onion mixture and cook until the turkey is almost cooked through; stir in the rice and the reserved zucchini cores. Place zucchini boats on a baking sheet and stuff the boats with the turkey filling that you’ve created.

Bake your boats for approximately 25 minutes or until the filling has slightly browned.

I am lucky to be a Californian where avocado never seems to go out of season, as this dressing is my “go-to” on many occasions. On busy weeknights, I toss this with some kale salad and dinner is served, but I’ve also been known to cut up fresh mango with diced red onion, Serrano pepper, and cilantro and use this as the dressing for a spicy-sweet fruit salad. Your imagination is the limit with this deliciously creamy dressing.

Avocado “Dressing”:

1 soft, ripe avocado
½ lemon, juiced
1 tsp extra virgin olive oil
S&P to taste

Mash the avocado into the bottom of your salad bowl. Squeeze ½ a lemon’s juice into the mashed avocado and add the extra virgin olive oil. Mash to combine, season to taste. Add any salad greens, noodles, veggies…that you would like and toss to coat.

Friday, May 17, 2013

welcome to my blog

This is a gluten free cooking and baking blog for everyone. Those avid bakers, novice bakers, non-bakers, cooks, non-cooks, eaters, readers...Ok, you get the point... the blog is for everyone. I have a genuine passion for cooking and baking. My passion comes from bringing people joy and pleasure over a great plate of food. I cook and bake gluten free every day and would like to inspire others to do the same. All of the recipes on this blog will be gluten free and, more often than not, dairy free. You'll also find that I also try to use unrefined sugar whenever possible. Please stay tuned...Try some recipes...Let me know what you think!