Friday, December 13, 2013
12 Days of Christmas - Day 1
For the first post of Jenna's Gluten Free Kitchen's 12 Days of Christmas, I am not posting a recipe or even a craft. This first post is dedicated to giving back to our communities. I try my best to do my part in keeping my community nice by picking up litter, keeping my front porch swept, and decorating for the holidays... But to find more creative ideas on how I could give back in a more meaningful way, I had to do some research. Embarassingly, some of the items on this list should've come to me naturally because I see the need in my community everyday. I hope that this list inspires you as it has me and don't forget that this list applies all year round!
Volunteer at a local school, senior center, hospital or animal shelter. These places always need extra helping hands and the experience is mutually beneficial! Whether you are sharing a skill or experience, helping with daily tasks or just to lend an ear and laugh a bit, connecting with your neighbors (two-legged or otherwise!) in this way is priceless. You can never under-estimate the wonder of simple interactions between two beings. Working closely with the healthcare industry, I see the need for patients to have meaningful relationships everyday. The companionship for elderly people helps keep their mind sharp, gives them something to look forward to, and most importantly makes them feel needed. You don't necessarily have to have to have a special skill to help out, you can play cards, read aloud to residents, or even paint their nails. If you have an especially loving pet, you might consider asking if you can bring him/her in to socialize with the patients...I'm sure you already know the healing powers of your pooch's snuggles!
Give blood. This is one of the easiest things you could ever do to help someone. Blood banks are always in need of more. As the American Red Cross says, “Give the gift of life.” Find your local Red Cross Chapter and go from there. If you’re extra motivated, talk to your employer about becoming a corporate partner and organize a blood drive at work. My employer hosts quarterly blood drives making it convenient to give blood.
Handy-(wo)man? Painter? Super Friendly? Your local community theater could use your skills to contribute to their performances. Or your local community organization could use your help for fairs, parades, or other fund-raisers. Added bonus: you could make new friends!
Baking for your get together? Consider doubling your batch to share with an elderly neighbor, the local police station, or fire department. I plan on doubling my batch of Maple Bacon Pecan Brittle to take to my local fire department later this week.
Wednesday, December 4, 2013
Ohemgee Cauliflower
In case you haven't noticed (or maybe you're living under a rock), cauliflower is delicious! Although it's season is September-ish, it's delicious all of the time and I am completely addicted to it.
On my last trip to the store I found a nice head of cauliflower and some (read: AMAZING) chanterelle mushrooms, and so I knew that roasted cauliflower with chanterelles would become a thing in the very near future (tonight). This recipe is so stinkin' easy that it can hardly even be called a recipe! But share, I must. I want you to enjoy the ohemgee deliciousness that is this cauliflower just as I did this very evening. So here it goes:
Ingredients:
1/2 Head of Cauliflower, cut into bite-sized florets
Chanterelle Mushrooms, the same volume as the cauliflower, cut into slightly larger pieces than the cauliflower
1 tsp Fresh Rosemary, chopped
3 cloves of Garlic, minced
2 tbsp Olive Oil
Salt and Pepper to taste
Preheat your oven to 400F
Clean and cut up cauliflower, mushrooms, rosemary and garlic and place into a large bowl.
Note: Mushrooms are best cleaned using a damp paper towel. Running them under water causes them to cook up tough for some reason. Whole chanterelle mushrooms have a lot of crevices that are hard to get into to clean. I usually cut them up after I've cut up all of my other ingredients and then clean them with a paper towel because when they're cut up they have fewer crevices AND if I cut them up last, I don't have to worry about mushroom "dirt" getting on my clean veggies.
Add olive oil, salt, and pepper to the bowl and toss to coat the cauliflower and mushrooms.
Spread your cauliflower and mushrooms out on a rimmed baking sheet in a single layer. Don't crowd the pan. Making sure that you only have a single layer ensures that your ingredients will roast instead of steam.
Roast cauliflower and mushrooms in your preheated oven for approximately 35 minutes, stirring halfway through so that all of the edges have the chance to caramelize.
Enjoy!
Recipe written by: Jenna Throne
On my last trip to the store I found a nice head of cauliflower and some (read: AMAZING) chanterelle mushrooms, and so I knew that roasted cauliflower with chanterelles would become a thing in the very near future (tonight). This recipe is so stinkin' easy that it can hardly even be called a recipe! But share, I must. I want you to enjoy the ohemgee deliciousness that is this cauliflower just as I did this very evening. So here it goes:
Ingredients:
1/2 Head of Cauliflower, cut into bite-sized florets
Chanterelle Mushrooms, the same volume as the cauliflower, cut into slightly larger pieces than the cauliflower
1 tsp Fresh Rosemary, chopped
3 cloves of Garlic, minced
2 tbsp Olive Oil
Salt and Pepper to taste
Preheat your oven to 400F
Clean and cut up cauliflower, mushrooms, rosemary and garlic and place into a large bowl.
Note: Mushrooms are best cleaned using a damp paper towel. Running them under water causes them to cook up tough for some reason. Whole chanterelle mushrooms have a lot of crevices that are hard to get into to clean. I usually cut them up after I've cut up all of my other ingredients and then clean them with a paper towel because when they're cut up they have fewer crevices AND if I cut them up last, I don't have to worry about mushroom "dirt" getting on my clean veggies.
Add olive oil, salt, and pepper to the bowl and toss to coat the cauliflower and mushrooms.
Spread your cauliflower and mushrooms out on a rimmed baking sheet in a single layer. Don't crowd the pan. Making sure that you only have a single layer ensures that your ingredients will roast instead of steam.
Roast cauliflower and mushrooms in your preheated oven for approximately 35 minutes, stirring halfway through so that all of the edges have the chance to caramelize.
Enjoy!
Recipe written by: Jenna Throne
Friday, November 22, 2013
Crispy Coconut-Almond Granola
Granola is one of those grocery items that is totally easy to just grab off of the shelf and throw in your cart without thinking twice (GUILTY! Also, guilty of spending an unconscionable amount of $$ on the GF stuff...But I digress...).
Motivated by freshness and quality ingredients, I set out to find a granola recipe that was easily adaptable, without loads of refined sugar and bad fat. Thus, I stumbled upon: Nigella Lawson’s “Andy’s Fairfield Granola”
I love this recipe (I also love Nigella!!) because it is super simple. With this recipe, I can easily control the amount (and kind!) of sweeteners and fats, not to mention the quality and cost of the ingredients for a healthy breakfast or snack all week long.
Ingredients:
5 cups Gluten Free Old-Fashioned Rolled Oats
2 cups Flaked Coconut, Unsweetened
1 ¼ cups Almonds, Chopped
2 tsps Vanilla Extract
2 tsps Ground Cinnamon
1 tsp Dried Ground Ginger
¼ tsp Ground Nutmeg
½ cup Unsweetened Applesauce (or another unsweetened fruit puree)
½ cup Agave Nectar
2 tbps Coconut Oil, melted
Preheat the oven to 300F
1. In a large bowl, mix together the oats, almonds, vanilla and spices.
2. In a small saucepan (or in the microwave for about 30-45 seconds), warm the fruit puree with the agave nectar, and oil.
3. Mix the fruit mixture into the dry ingredients until the oats and nuts are covered evenly, then divide and spread the mixture evenly on two baking sheets.
4. Bake the granola for about 40 minutes, stirring every seven minutes, until the granola is golden brown. Your granola may take more or less time depending on your oven’s actual temperature.
5. Remove from the oven as soon as the granola is slightly golden brown and let cool on the baking sheet. You’ll be able to tell when it is done because the oats will feel lighter when you stir them.
This granola can be stored in an airtight container on the counter for a couple of weeks. AND because I had them on hand, I added: ¼ c Dried Gogi Berries, ¼ c Dried Blueberries, and ¼ c Dried Cranberries to my granola and it turned out even more amazing! Also, you can easily swap out coconut oil for another vegetable oil, and the nuts and flaked coconut for other "add-in" ingredients that you prefer, to create your ideal breakfast! Get creative!
This granola is great with milk, yogurt, or even ice cream! (I can't lie, I totally top my coconut ice cream with it...regularly.)
Happy Eating!
Granola is one of those grocery items that is totally easy to just grab off of the shelf and throw in your cart without thinking twice (GUILTY! Also, guilty of spending an unconscionable amount of $$ on the GF stuff...But I digress...).
Motivated by freshness and quality ingredients, I set out to find a granola recipe that was easily adaptable, without loads of refined sugar and bad fat. Thus, I stumbled upon: Nigella Lawson’s “Andy’s Fairfield Granola”
I love this recipe (I also love Nigella!!) because it is super simple. With this recipe, I can easily control the amount (and kind!) of sweeteners and fats, not to mention the quality and cost of the ingredients for a healthy breakfast or snack all week long.
Ingredients:
5 cups Gluten Free Old-Fashioned Rolled Oats
2 cups Flaked Coconut, Unsweetened
1 ¼ cups Almonds, Chopped
2 tsps Vanilla Extract
2 tsps Ground Cinnamon
1 tsp Dried Ground Ginger
¼ tsp Ground Nutmeg
½ cup Unsweetened Applesauce (or another unsweetened fruit puree)
½ cup Agave Nectar
2 tbps Coconut Oil, melted
Preheat the oven to 300F
1. In a large bowl, mix together the oats, almonds, vanilla and spices.
2. In a small saucepan (or in the microwave for about 30-45 seconds), warm the fruit puree with the agave nectar, and oil.
3. Mix the fruit mixture into the dry ingredients until the oats and nuts are covered evenly, then divide and spread the mixture evenly on two baking sheets.
4. Bake the granola for about 40 minutes, stirring every seven minutes, until the granola is golden brown. Your granola may take more or less time depending on your oven’s actual temperature.
5. Remove from the oven as soon as the granola is slightly golden brown and let cool on the baking sheet. You’ll be able to tell when it is done because the oats will feel lighter when you stir them.
This granola can be stored in an airtight container on the counter for a couple of weeks. AND because I had them on hand, I added: ¼ c Dried Gogi Berries, ¼ c Dried Blueberries, and ¼ c Dried Cranberries to my granola and it turned out even more amazing! Also, you can easily swap out coconut oil for another vegetable oil, and the nuts and flaked coconut for other "add-in" ingredients that you prefer, to create your ideal breakfast! Get creative!
This granola is great with milk, yogurt, or even ice cream! (I can't lie, I totally top my coconut ice cream with it...regularly.)
Happy Eating!
Tuesday, November 12, 2013
Jenna's Famous Grilled Lamb
I am not a fortune teller, but something tells me that in the very near future this lamb recipe will be very famous... This is by far the most requested dinner around these parts. This lamb is flavorful, juicy, and simple. I get my rack of lamb at Costco. It's Kirkland brand, already Frenched, and you cannot beat the price (really). This lamb recipe would be a really special treat for the holidays, I' m thinking of making it for Thanksgiving...Why should turkey get all of the attention?
Ingredients
1 rack of Lamb, Frenched
5 sprigs of Fresh Rosemary, stemmed and minced
5 sprigs of Fresh Thyme, stemmed and minced
3 cloves of Garlic, minced
2 tbsp Olive Oil
1 tsp Kosher Salt
1/2 tsp Fresh Ground Black Pepper
Preheat your grill to medium temperature. Disclaimer: I am fortunate enough to live in California, where grilling in the winter months is acceptable. This recipe could easily be made indoors: Preheat your oven to 400 degrees and prepare a roasting pan with a rack or large chunks of celery, onion, and/or carrot.
While your grill (or oven) is preheating, make a (delicious) paste out of your herbs, garlic, olive oil, salt and pepper. Mix well, mashing with your fork to combine so that all of the flavors become the best of friends.
Prepare the rack of lamb by patting it dry with a paper towel, so that the seasoning sticks to it. Then cover the Frenched bones with aluminum foil, so that they don't burn (or char) while cooking.
Next, massage (yes, really. massage) your seasoning paste onto the lamb to cover it, making sure to get both ends and the bottom.
Grilling:
Place your seasoned lamb fat side down on your medium heat grill, close the lid. Let grill for approximately 5-6 minutes, or until your lamb pulls away from the grill easily. Don't walk away! That lamb fat will make the grill fire's day by helping it flare up and char your lamb to an inedible crisp. (I speak from experience...) Turn lamb to the second side and continue to cook for approximately 7-8 minutes. Lastly, you'll flip your lamb one more time, back to fat side down, to crisp up the fat for a few short minutes over a high heat grill. Watch it, or it'll surely burn! (you've been warned)
Oven:
Place your seasoned lamb fat side up in your prepared roasting pan. Put the pan into your preheated oven and cook for approximately 5-7 minutes. Reduce the oven's temperature to 300 degrees and cook for approximately 12-15 minutes longer, depending on how well you like your lamb cooked.
I like my lamb medium-rare, which is how I've written this recipe. If you prefer your lamb more well-done, cook it longer. You can tell how well a piece of lamb is cooked by how much it gives when you press on the meatiest section gently with tongs. If it doesn't give much, it's cooked more thoroughly; if it gives easily to the pressure, it is more rare.
Once your lamb is done to your liking, remove it from the heat and cover it with aluminum foil for approximately 5-10 minutes. This step allows the juice in the lamb to redistribute and results in much juicier servings. Don't worry, the foil keeps it from getting cold.
I like to serve my lamb with grilled asparagus and garlic quinoa. But this lamb recipe is very versatile and could be served with anything that you like, including mint jelly... Blleeeehhhh...
Recipe by: Jenna Throne
Ingredients
1 rack of Lamb, Frenched
5 sprigs of Fresh Rosemary, stemmed and minced
5 sprigs of Fresh Thyme, stemmed and minced
3 cloves of Garlic, minced
2 tbsp Olive Oil
1 tsp Kosher Salt
1/2 tsp Fresh Ground Black Pepper
Preheat your grill to medium temperature. Disclaimer: I am fortunate enough to live in California, where grilling in the winter months is acceptable. This recipe could easily be made indoors: Preheat your oven to 400 degrees and prepare a roasting pan with a rack or large chunks of celery, onion, and/or carrot.
While your grill (or oven) is preheating, make a (delicious) paste out of your herbs, garlic, olive oil, salt and pepper. Mix well, mashing with your fork to combine so that all of the flavors become the best of friends.
Prepare the rack of lamb by patting it dry with a paper towel, so that the seasoning sticks to it. Then cover the Frenched bones with aluminum foil, so that they don't burn (or char) while cooking.
Next, massage (yes, really. massage) your seasoning paste onto the lamb to cover it, making sure to get both ends and the bottom.
Grilling:
Place your seasoned lamb fat side down on your medium heat grill, close the lid. Let grill for approximately 5-6 minutes, or until your lamb pulls away from the grill easily. Don't walk away! That lamb fat will make the grill fire's day by helping it flare up and char your lamb to an inedible crisp. (I speak from experience...) Turn lamb to the second side and continue to cook for approximately 7-8 minutes. Lastly, you'll flip your lamb one more time, back to fat side down, to crisp up the fat for a few short minutes over a high heat grill. Watch it, or it'll surely burn! (you've been warned)
Oven:
Place your seasoned lamb fat side up in your prepared roasting pan. Put the pan into your preheated oven and cook for approximately 5-7 minutes. Reduce the oven's temperature to 300 degrees and cook for approximately 12-15 minutes longer, depending on how well you like your lamb cooked.
I like my lamb medium-rare, which is how I've written this recipe. If you prefer your lamb more well-done, cook it longer. You can tell how well a piece of lamb is cooked by how much it gives when you press on the meatiest section gently with tongs. If it doesn't give much, it's cooked more thoroughly; if it gives easily to the pressure, it is more rare.
Once your lamb is done to your liking, remove it from the heat and cover it with aluminum foil for approximately 5-10 minutes. This step allows the juice in the lamb to redistribute and results in much juicier servings. Don't worry, the foil keeps it from getting cold.
I like to serve my lamb with grilled asparagus and garlic quinoa. But this lamb recipe is very versatile and could be served with anything that you like, including mint jelly... Blleeeehhhh...
Recipe by: Jenna Throne
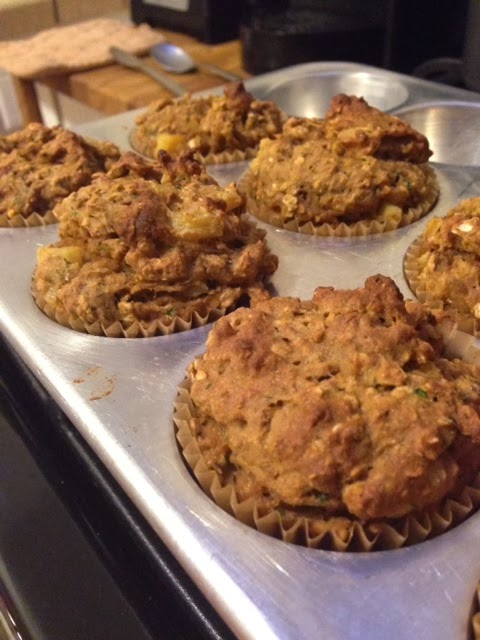
Skinny Zucchini Pineapple Muffins
So, I haven’t posted any recipes in awhile. Blame it on my lack of creative juices… busy schedule…or just plain laziness, I will not!! I don’t have any great excuses, only that I’ve been testing a lot of recipes and none of them have been up to par, or awe-inspiring, or worthy of posting to the blog. This blog is a record of my recipe successes, not my recipe “meh, that’s edible…”
I think someone once said, necessity is the mother of invention, and that is exactly how this recipe was born. I like to sleep in in the morning for every single second I can before I actually have to get up and go to work, and breakfast doesn’t win out over sleep. But eat, I must. So, I needed a (healthy) breakfast that I could grab on my way out the door to eat in my car during rush hour AND something that meets all of my other insanely neurotic requirements:
Free of dairy, gluten, refined sugar
Low-fat
Low-calorie
High fiber
And high protein to keep me full until I can find a minute to stuff my face with my second meal of the day (lunch…)
Thus, Skinny Pineapple Zucchini Muffins were born! (I know, I’m excited too…) I think (read: HOPE!!) that I’ve created a recipe that you will love! They are a delicious, quick grab-and-go breakfast, and healthy to boot. These Skinny Pineapple Zucchini Muffins are dairy, gluten, oil, and refined sugar free! I hope that you love them as much as I do.
Skinny Pineapple Zucchini Muffins
1 cup Gluten Free All-Purpose Flour
1 cup Gluten Free Quick Cooking Oats
1 1/8 tsp Baking Soda
½ tsp Salt
1 tsp Xanthan Gum
½ tsp Cinnamon
1/8 tsp Ground Nutmeg
½ cup Walnuts, Chopped (OPTIONAL)
1 large Egg, Beaten
½ cup Coconut Sugar
1 tsp Vanilla
¾ cup Unsweetened Applesauce
¼ cup Cultured Almond Milk Yogurt, I used SO Delicious Brand
1 cup Zucchini, Shredded
½ cup Crushed Pineapple in Juice
Preheat oven to 350 degrees
Line muffin pan with muffin liners
Please note: When I am baking gluten free, I like to use either a whisk or a fork (depending on what I am making) to combine my ingredients, so as not to over mix. Gluten free baking components tend to absorb the wet ingredients quickly, which is why it is important to make all necessary preparations in advance, so that your batter isn’t sitting for an extended period of time. Preheat your oven, line your muffin pan, get all ingredients out on your workspace so they are ready to use. If the batter sits, your baked good may end up with a less than appetizing texture.
Combine all of the dry ingredients in one bowl: Flour, oats, baking soda, salt, xanthan gum, cinnamon, nutmeg, and walnuts if you’re using them. You can really substitute any type of nut that you have on hand, or even dried fruit if you’re feeling like a real rebel!
In a separate bowl, combine the wet ingredients: egg, sugar, vanilla, applesauce, almond milk yogurt, zucchini, and pineapple.
Stir your dry ingredients into your wet ingredients, just to combine. Do not over mix.
Fill muffin cups with the prepared batter. I used a 1/3 cup measure to fill my cups, but you could use an ice cream scoop or another method, just ensure that the cups are filled to the rim.
Bake in a 350 degree oven for 15 minutes and rotate the pan. Bake for another 10-12 minutes or until a toothpick inserted into the center of a muffin comes out clean.
This recipe makes about 12 muffins. The muffins freeze really well if they are cooled entirely before freezing. I store mine in the freezer in an airtight container and pull one out each morning and microwave it for about 45 seconds to defrost/warm up.
Recipe by: Jenna Throne
Monday, October 28, 2013
Not Just Another Weeknight Chicken...version Trader Joe's
So, we are all always looking for another chicken recipe. How can we make the same ole’, same ole’ new again? And easy, and fast, and healthy, and cheap? This chicken recipe meets all of those requirements. It meets those requirements because you use a little help from the most highly trafficked grocery store that I can(
Ingredients:
4 Chicken Breast Cutlets, these are the skinny slices of the breast. Make your own here (BUT you’ll need a knife and a cutting board…Sooo… Give your butcher some job security…)
2 Cubes of Crushed Garlic, (Trader Joe’s frozen)
2 Cubes of Chopped Basil, (Trader Joe’s frozen)
1 (large) Splash of White Wine (It’s a good reason to open a new bottle. White wine will be perfect with this dinner!)
8 Tbsp of Artichoke Antipasto, (Trader Joe’s jarred)
Olive Oil
Salt and Pepper to taste
Preheat olive oil in a large skillet over medium heat. While it’s preheating, season your chicken with salt and pepper to taste.
Drop the crushed garlic and the basil into the preheated oil, and then add your seasoned chicken to the pan, followed by a splash of white wine.
Cook chicken approximately 2-3 minutes on the first side, then flip the chicken over and coat the cooked side of each piece of chicken with about 2 tablespoons of the Artichoke Antipasto. Put a lid on the skillet and let all of those delicious flavors marry for approximately 5-6 more minutes or until the chicken is cooked thoroughly.
And there it is. Done. Delicious. Easy. Especially easy if you serve it with steamed veggies and microwave Seeds of Change garlic quinoa rice from Costco! You could add a little something extra to your chicken by giving it a squeeze of fresh lemon juice while cooking, and adding some capers or chopped green olives near the end of cooking.
Tuesday, October 15, 2013
Winner, Winner, Chicken Dinner!
Roasted Chicken and Root Veggies:
This is one of my main dinner staples. When I get home from a hard day at work, the last thing I want to do is slave over a hot stove. This recipe is simple and the hardest part is changing the oven’s temperature part way through… The majority of the work in this recipe goes into cutting the veggies, which I find pretty therapeutic…Pretend those veggies are the problem that you had to deal with at work today and cut them up and eat them…VoilĂ ! Problem solved. (Or you can just use the grocery store’s help and buy their pre-cut veggies if you’re not nearly as crazy as I am…)
Serve this recipe with a side salad to add something green to your plate without a lot of work. I usually do an arugula salad dressed with extra-virgin olive oil, a squeeze of lemon juice, and some salt and pepper.
Ingredients –
1 large Sweet Potato, cubed into 1” chunks
1 cup of Rutabaga, cubed into small bite sized pieces
½ cup of Turnip, cubed into small bite sized pieces
1 Carrot, cut into 1” chunks
2 stalks of celery, cut into 1” chunks
½ a small onion, cut into ½” wedges
4-ish cloves of garlic (I like it garlicky!!), smashed with the side of your knife and palm of your hand
2 tbsp of Olive Oil, don’t use the expensive stuff here…It’s getting cooked…
4 pieces of chicken thighs, whole, skin on
Season to taste. You can use salt and pepper, maybe some ground garlic, but I prefer McCormick Montreal Steak Seasoning. It has everything it in already and can be added in one step (I’m lazy…). For this recipe, I use about a tablespoon of seasoning on everything, veggies and chicken.
Preheat your oven to 425 degrees.
Line your baking dish with foil, any oven-safe dish really, this recipe is not only versatile, it’s very forgiving…You could use a baking sheet (like me), or a square casserole, just line whatever dish you pick with foil so that you don’t have to clean the pan when you’re done (…Again, I’m lazy).
In a large bowl, combine veggies, garlic, onion, 1 tbsp of olive oil, and seasoning of choice. Stir to coat veggies. Place veggie mixture into your prepared baking dish.
Wash your chicken (!!!) and pat it dry. Place the chicken pieces on top of the veggies that you’ve already put in their designated baking dish. Coat the chicken pieces with the remaining olive oil and season to taste.
Here’s the hard part: you have to set the timer…AND change the oven temperature…I know, it’s a lot to ask, but the end result is worth it…
Put your prepared dish into your preheated 425-degree oven. Bake for 15-20 minutes (this gives you that sinfully delicious, heart-attack inducing, crispy chicken skin). After the 15-20 minutes are up, turn the oven temperature down to 350 and bake for approximately 40-45 more minutes, this time varies because not all ovens run exactly to temp. Check your chicken’s doneness by sticking a knife in the thickest part of a piece and twist it just so to make the juices run. If the juices run clear, your chicken is done! If the juices run pink-ish or red, cook your chicken longer because it’s not done; and I don’t think eating or serving raw chicken will win you any new friends.
Subscribe to:
Posts (Atom)